There are a few different ways of doing flocking powder nails but this is just how I do them =)
You will need:
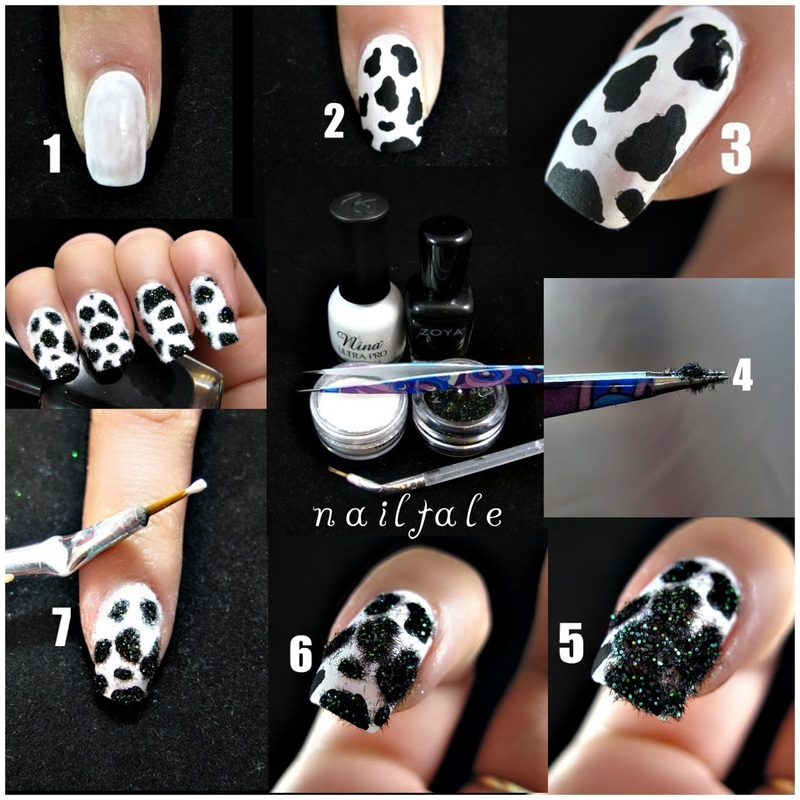
Paint your nails with the base colour you'd like to use (mine here was white). It doesn't have to be a thick coat because it will be covered with powder later on. This is just in case there are any "bald" spots.
Step 2:
I used black acrylic paint to paint the spots on because it is fast drying and I used it as a template. You can use polish or skip this step, I personally just need to see the whole picture before starting with the powder =)
Step 3 & 4:
Go over the black spots with black nail polish (or just make spots if you didn't do step 2). Don't make it too thick because it will spread when you press the flocking powder on.
Using your tweezers, grab a small clump of the same coloured powder and lay it on the wet polish. Then lightly press down either with the tweezers or a finger.
Step 5 & 6:
Picture 5 is right after I put the powder onto a couple of the wet spots. Picture 6 is after I blew off the excess powder. If your base coat (white here) gets too covered with flocking powder (black here), use a dotting tool or a thin brush to wipe it off.
Repeat steps 3-6 for all black spots.
Step 7:
Once all the black spots have been covered with powder, use your other polish colour (white here) and paint over the "naked" parts. So basically just paint over all the parts that don't have any powder on them. I do half a nail at a time so the polish doesn't dry before I can get the powder on.
Follow the same steps as the black powder - press on with tweezers/fingers and then blow the excess off. I also use a small dotting tool to *lightly* scrape over the black spots to get any stray white powder off.
You will need:
- Tweezers (mine are by Quo)
- Nail polish (your choice of colours)
- Flocking powder (close to the shade of polish you are using because the polish can show through sometimes); I love the flocking powder sold on Born Pretty Store's website. The ones I'm using here are by Martha Stewart available at Michaels Craft Store but they have little pieces of shiny green powder. The BPS ones are simply one shade and great quality.
- Acrylic paint (not necessary; you can use all polish if you want)
Paint your nails with the base colour you'd like to use (mine here was white). It doesn't have to be a thick coat because it will be covered with powder later on. This is just in case there are any "bald" spots.
Step 2:
I used black acrylic paint to paint the spots on because it is fast drying and I used it as a template. You can use polish or skip this step, I personally just need to see the whole picture before starting with the powder =)
Step 3 & 4:
Go over the black spots with black nail polish (or just make spots if you didn't do step 2). Don't make it too thick because it will spread when you press the flocking powder on.
Using your tweezers, grab a small clump of the same coloured powder and lay it on the wet polish. Then lightly press down either with the tweezers or a finger.
Step 5 & 6:
Picture 5 is right after I put the powder onto a couple of the wet spots. Picture 6 is after I blew off the excess powder. If your base coat (white here) gets too covered with flocking powder (black here), use a dotting tool or a thin brush to wipe it off.
Repeat steps 3-6 for all black spots.
Step 7:
Once all the black spots have been covered with powder, use your other polish colour (white here) and paint over the "naked" parts. So basically just paint over all the parts that don't have any powder on them. I do half a nail at a time so the polish doesn't dry before I can get the powder on.
Follow the same steps as the black powder - press on with tweezers/fingers and then blow the excess off. I also use a small dotting tool to *lightly* scrape over the black spots to get any stray white powder off.
 RSS Feed
